Here is a list of errors and their possible solutions that you may come across while updating to windows 8.1.
1. Login issues after upgrading to Windows 8.1.


Figure D

Local account
3. Couldn't update to Windows 8.1 - 0xC1900101 - 0x40017: Or 0xC1900101 - 0x20017

Choose Command Prompt (Admin) to open the admin elevated command prompt
(These are possible steps to fix the problem but do not guarantee a fix. Some of the solutions may include advanced troubleshooting including editing the registry which if done incorrectly may cause serious problems to your computer and may result in data loss. Please try the steps at your own risk and i'll not be responsible for any problems that may arise by performing these possible solutions.)
Here are some of the most common show-stopping errors that people have run into over Windows 8.1's launch weekend. Some have fixes. Some do not.
1. Login issues after upgrading to Windows 8.1.
Or,
How Change to a local account in Windows 8.1?
After you install Windows 8.1, you will be asked to sign in to a Microsoft Live account. Most users that used their local account to login to Windows 8 are making errors at this stage and have ended up in creating a new Microsoft account instead even when they already have a Microsoft live account. This creates a confusion in the login password.
This is what needs to be done..
After Windows 8.1 upgrade there will be no apparent way to move past that Microsoft live.com login screen if your intention is to only have a local account.
Click the Create New Account link and then at the bottom of that next screen you will see a link that will let you cancel the process. You will then login using your local account.
Many users got caught bin this log in process and ended up creating and / or using a Microsoft account to log in to their new Windows 8.1 operating system.
First, go to the Start Screen and type "Users" to get search results. Click the first item in the search results and you will get a screen similar to the one below...
Figure 1
Next Click the Add,delete and manage other user accounts
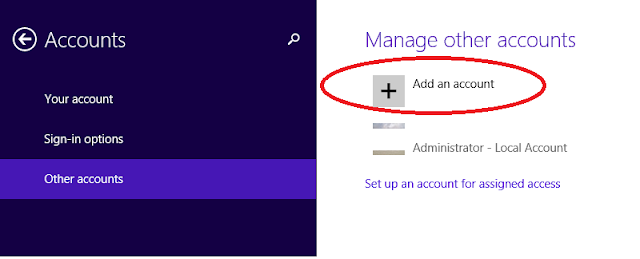
Click on Add an Account as shown below
Figure B

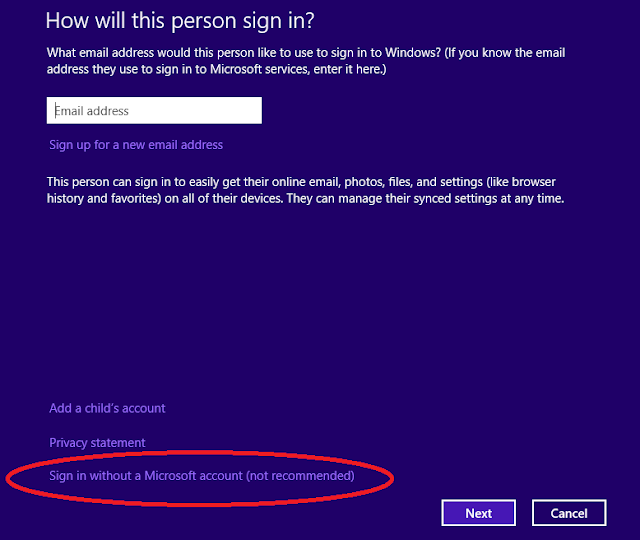
How will this person sign in?
Clicking the Add an Account will take you to the How will this person sign in? screen shown in Figure C. This is the screen which is crucial to create a local account.
Microsoft would want you to create a new account with them, but you can click the link at the bottom of the screen that says: Sign in without a Microsoft account. You can just ignore the "not recommended" advice.
Figure C: Sign in without a Microsoft account

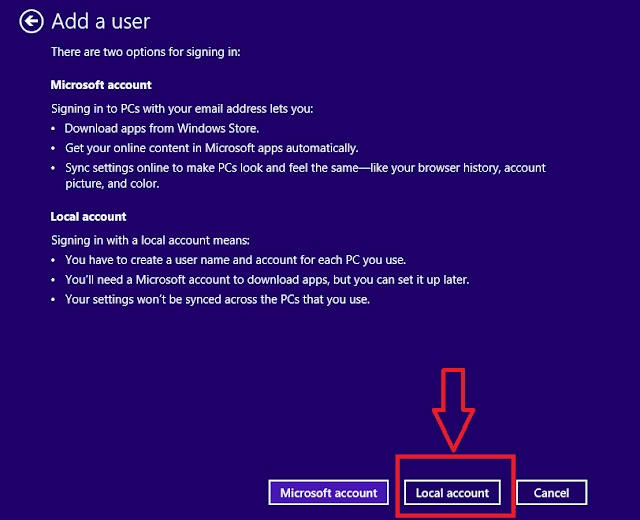
After you click next in the above screen it'll take you to "Add a User" screen as in Figure D. Clicking on the Local Account button at the bottom as shown in Fig D will take you to the Local Account Credentials screen as in Fig E
Figure D

Local account
Click the next button and then the Finish button and you will have created a new Local account that you can log into instead of your Microsoft account.
Figure E : Local Account Credentials
On this screen you can setup a windows login password or just leave it blank if you prefer not to have one as i have done above.(It is recommended to have a password for security).
Then click Next and then Finish
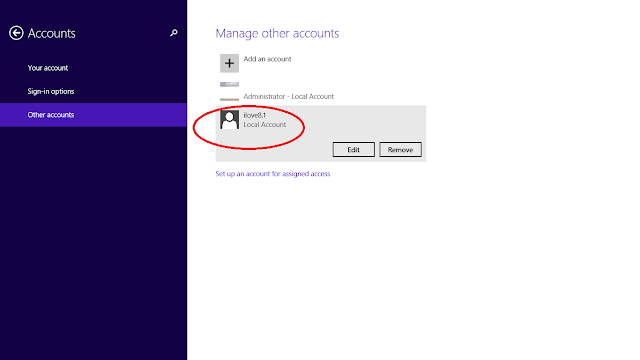
Figure F
New Account will be displayed as shown below. The account can be used to log in without connecting to Internet and is not related to the live.com email address.

2. Secure Boot isn't configured correctly." : Error after updating to Windows 8.1

2. Secure Boot isn't configured correctly." : Error after updating to Windows 8.1
This message reportedly appears on the desktop as a watermark, and is one of the more common errors encountered when upgrading to the new OS.
Workaround Provided by Intel:
i. Go to the secure boot options on BIOS
ii. Enable secure boot (if disabled)
iii. Check on the option that says “Install Intel platform key”
iv. Press F10 to save changes and restart the system
iii. Check on the option that says “Install Intel platform key”
iv. Press F10 to save changes and restart the system
Note: For computers that were updated from Windows 7 to Windows 8 may not always have the Secure Boot or intel Option in their BIOS. For such computers you need to update the BIOS prior to doing the Upgrade.
According to Intel this is a workaround as the drivers are not yet release for Windows 8.1
v. You updated to Windows 8.1 or Windows 8, but didn't have a previous version or the correct edition of Windows installed (error 0xC004F061)
This Error is mostly happening for high end notebooks with switchable/discrete graphics card. But the good thing about this is that the system tends to rollback to Windows 8 with causing any boot issues.
Completing all pending windows updates, or updating the latest Graphics Drivers for Nvidia and AMD websites have fixed the issue for few only.
If you have HP Support Assistant installed make sure to check for all HP pending updates.
Currently no updates have been released from the graphics vendors so have not across any other solutions.So keep looking and please share if you find any other solution.
4. Error code 0x80240031
Here are few thing that you can try that have worked for few. If it doesn't work i would recommend you ignore the update for next few days till a proper fix it rolled out.
- A) Complete all Windows updates and driver updates
First and Foremost is to make sure all windows updates are update date and completed. If you use an HP computer then run HP Support Assistant to find any pending updates. Do the same for all other computers by going to manufacturer's drivers and downloads page
- B) Use SFC / SCANNOW
i. Press the Windows button + X on your keyboard, and select the Command Prompt (Admin) that will appear in the Pop up on the left corner of the screen
ii. On the command prompt type sfc /scannow and hit enter. This will run for sometime. If no errors were found then restart your computer and try to win 8.1 updating again.
iii. If errors where found, try to fix it using DISM.
iv. On the same command prompt window type Dism /Online /Cleanup-Image /RestoreHealth
v. After the repair is complete, restart your computer and try updating now
3. This will open the PC Settings in General category. Scroll down and look for “Advanced Startup” and click Restart Now
4. Click Troubleshoot and then click Advanced options, then finally hit Automatic Repair
iii. If errors where found, try to fix it using DISM.
iv. On the same command prompt window type Dism /Online /Cleanup-Image /RestoreHealth
v. After the repair is complete, restart your computer and try updating now
C. Try Automatic Repair
1. Go to search or hit Windows button + Q
2. From the search click “Settings” found on the right side and type Advanced Startup Options and hit enter3. This will open the PC Settings in General category. Scroll down and look for “Advanced Startup” and click Restart Now
4. Click Troubleshoot and then click Advanced options, then finally hit Automatic Repair
D. Try to Refresh Your PC from Advanced Boot Options (Recovery Console)


No comments:
Post a Comment